Do you love cycling? Then you need this Smart Helmet!
![]()
![]()
In 2018, over 500,000 cyclists were seriously injured on US roads. In Fact: Cyclists are 15 times more likely than drivers to be killed. The Number One Risk Factor is a lack of visibility.
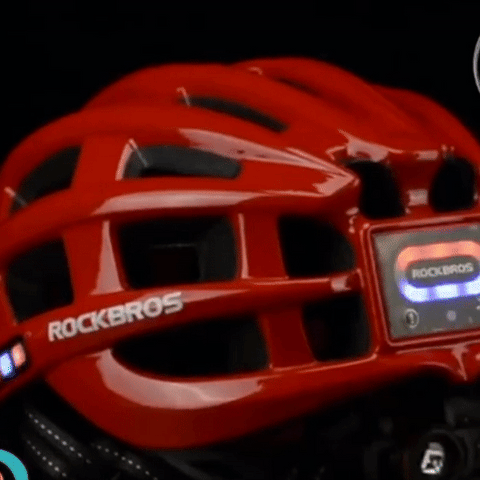
Our Smart Helmet is equipped with extremely powerful 2000ma LEDs light in the front, on the sides, and in the back to ensure you stand out on the road.
![]()
Drivers, pedestrians, and other cyclists are going to see you coming when youre wearing a Smart Helmet. Now, you can ride in massively increased safety without the need for a bevy of accessories.
![]()
VISIBILITY AROUND-THE-CLOCK
Morning or midnight, the Smart Helmet keeps you easily visible. The bright LED lights, integrated right on the most crucial part of your safety gear make you never ride in the dangerous dark again.
Imagine a car tries to make a left turn across your path, or noses out to make a right turn into your lane, or merges directly into you, or... the possibilities are endless, but one thing is for sure: the car always wins.
The number one reason? Cars rarely see cyclists who aren't equipped with a very bright front headlight and powerful rear flasher, so you might as well consider yourself invisible to vehicles if you ride without a Smart Helmet.
![]()
SUITABLE FOR ANY WEATHER
Rain or Shine, whenever you're riding your bike, you can count on your weatherproof Smart Helmet.
RECHARGEABLE BATTERY
Charging the Smart Helmet with the included magnetic USB charging cable is as convenient as it gets. It takes about 1-2 hours to fully charge. The Battery lasts 4-5 hours in mighty mode, 9-10 hours in low mode and over 24 hours in flash mode.
MULTI-PURPOSE HELMET
The usability of the Smart Helmet goes way beyond biking. Its perfectly usable for various activities such as riding, rock climbing, skateboarding, ice skating, sledding, water sports, etc.
EASY TO USE BUT POWERFUL IN ACTION
With the 3 available modes, you have the possibility to turn on different lights and adjust the luminosity. Furthermore, you can push the headlight operating lever forward to adjust the angle and focus of the light: the light gathers. It can be adjusted up and down about 20 degrees.
![]()
![]()
![]()
![]()
![]()
FEATURES AND BENEFITS
- Unisex
- One size fits all
- High-Quality materials
- Adjustable design
?
![- Wax Seal Stamp - [Royal Wax Seals]](http://img.staticdj.com/5f77bf6ad5deadc08da43c7ebb6e473f_600x.png)
![Smart Bike Helmet with LED Light 5 Colors - Wax Seal Stamp - [Royal Wax Seals]](http://img.staticdj.com/1e8332cfde2dd28c1c9d8081823a6fcd_1080x.jpeg)
![Smart Bike Helmet with LED Light 5 Colors - Wax Seal Stamp - [Royal Wax Seals]](http://img.staticdj.com/b2dd32b58e02920e7281a7b861450f2b_1080x.jpeg)
![Smart Bike Helmet with LED Light 5 Colors - Wax Seal Stamp - [Royal Wax Seals]](http://img.staticdj.com/61c98d3ca92460bc6663c15ec67dc3fa_1080x.jpeg)
![Smart Bike Helmet with LED Light 5 Colors - Wax Seal Stamp - [Royal Wax Seals]](http://img.staticdj.com/9137336b65baa10528af6e478c191f96_1080x.jpeg)
![Smart Bike Helmet with LED Light 5 Colors - Wax Seal Stamp - [Royal Wax Seals]](http://img.staticdj.com/fe5ef7e3985823fbe74077326448613f_1080x.jpeg)
![Smart Bike Helmet with LED Light 5 Colors - Wax Seal Stamp - [Royal Wax Seals]](http://img.staticdj.com/c31f3223a3dd2d7dd2f0e8fa9a5c5a64_1080x.jpeg)
![Smart Bike Helmet with LED Light 5 Colors - Wax Seal Stamp - [Royal Wax Seals]](http://img.staticdj.com/fa7a367900f219b463949061eade9b62_1080x.jpeg)
![Smart Bike Helmet with LED Light 5 Colors - Wax Seal Stamp - [Royal Wax Seals]](http://img.staticdj.com/b676eda4b1b97519d7921defaf80c8c1_1080x.jpeg)
![Smart Bike Helmet with LED Light 5 Colors - Wax Seal Stamp - [Royal Wax Seals]](http://img.staticdj.com/1e8332cfde2dd28c1c9d8081823a6fcd_100x.jpeg)
![Smart Bike Helmet with LED Light 5 Colors - Wax Seal Stamp - [Royal Wax Seals]](http://img.staticdj.com/b2dd32b58e02920e7281a7b861450f2b_100x.jpeg)
![Smart Bike Helmet with LED Light 5 Colors - Wax Seal Stamp - [Royal Wax Seals]](http://img.staticdj.com/61c98d3ca92460bc6663c15ec67dc3fa_100x.jpeg)
![Smart Bike Helmet with LED Light 5 Colors - Wax Seal Stamp - [Royal Wax Seals]](http://img.staticdj.com/9137336b65baa10528af6e478c191f96_100x.jpeg)
![Smart Bike Helmet with LED Light 5 Colors - Wax Seal Stamp - [Royal Wax Seals]](http://img.staticdj.com/fe5ef7e3985823fbe74077326448613f_100x.jpeg)
![Smart Bike Helmet with LED Light 5 Colors - Wax Seal Stamp - [Royal Wax Seals]](http://img.staticdj.com/c31f3223a3dd2d7dd2f0e8fa9a5c5a64_100x.jpeg)
![Smart Bike Helmet with LED Light 5 Colors - Wax Seal Stamp - [Royal Wax Seals]](http://img.staticdj.com/fa7a367900f219b463949061eade9b62_100x.jpeg)
![Smart Bike Helmet with LED Light 5 Colors - Wax Seal Stamp - [Royal Wax Seals]](http://img.staticdj.com/b676eda4b1b97519d7921defaf80c8c1_100x.jpeg)